9.27.2012

Nails: Gradient Spun Sugar

Today's nails were inspired by friend Sarah, also known as Chalkboard Nails.  She had done a nail design based off of a dress by Betsey Johnson during NYFW.  You could read more about it at her blog.  She had a nice framed sponged base, and did  the spun sugar technique over it.  I have seen the technique before, but never attempted it; always wanted to try it out.  Sarah's post of it was the push I needed!

As I was doing the spun sugar on my nails I quickly realized I wanted cotton candy!  Not just any cotton candy, the ones you get at fairs, amusement parks, etc.  It brought me back to when I was little waiting in line as the person was twirling the stick thingy in the machine to swoop up the cotton candy.  And you would see the sugar strings stick against the glass/plastic shield.

The spun sugar technique isn't as difficult as it seems at all, and I found it pretty fun to do.  May be a bit time consuming, but well worth it in the end.


9.25.2012

Nails: Take a trip with me to outer-space!

Come with me and travel outer-space as I take you on a journey of my galaxy nails!

Today's nails were inspired by my lovely friends : Emily and Christina.  I am so glad I met these two really.  They inspire me in so many ways be it nails makeup or just grabbing a bite to eat.  I could always count on them for a laugh.  So make sure to check out their blogs:


They recently both did a galaxy drip, that as soon as I saw them I loved it!  I knew I had to do a galaxy mani since I haven't done for awhile, and not to mention they are always a blast to make. 


9.23.2012

Oh Mail Oh My! Goodies from the motherland

I received a package from my best friend, Leslie, who lives in the Philippines.  I was super excited with this package since I would finally have some brands from the motherland in my collection.  She's even a wonderful adopted aunt to my kid, and got him something.  Which by the way, haha he never leaves home without his Angry Birds headphones.


Seriously maraming salamat (so much thanks basically) for always being there for me through thick and thin.  And opening up my eyes to new products.  Love you always!


I'll show you guys what I received for now, and over time I will do reviews of the items when I get around to it.

9.19.2012

Review: KKCenterHk Pink Little Flower & Colorful Flower Water Decals

Today I am bringing to you another product from KKCenterHk:  Pink Little Flower [WDSY1187] & Colorful Flower [WDSY716]  water decals nail art decorations.  The reason why I am combining this post is because after making one hand set of each water decal look, I thought "Hey I am going to wear one look on one hand and the other one on the other hand."  Sadly when I took these photos I used the same hand to model them haha!  So sorry for the confusion, but on to those decals!

If you are unclear how to use water decals here is a quick tutorial on it:


Basically what you need:

  • A cup/bowl of water obviously
  • Scissors
  • Your water decal sheet.  NOT STICKERS!
  • Paper towel or tissue
  • Tweezers is optional
  • Your nails done

When I mean by done, have your base color done at least so you could apply the decals on them.  They do not need to have a top coat already on them.

Next cut out the design you want for each finger and set them to the side.  When you are ready to start putting these on, remove the protective plastic sheath/layer on it.

Dip your decal into the water carefully, and let it sit in there for a few seconds.  Be sure that your decal does not bob to the bottom or side.  You'll have issues trying to lift it out.


Take the decal out of the water with your tweezers, and place it image side down on to your finger.  Slide the paper back and you will see the image upon your finger.  With the image finger angle it right to where you would want it on your nail.  Like how you use a stamper from a stamp plate rock your finger left and right on that area to put it.  Dab off any access water that may be on it with a paper towel or tissue paper.  Afterwards seal it with your favorite topcoat.

Immense nail art work as needed!

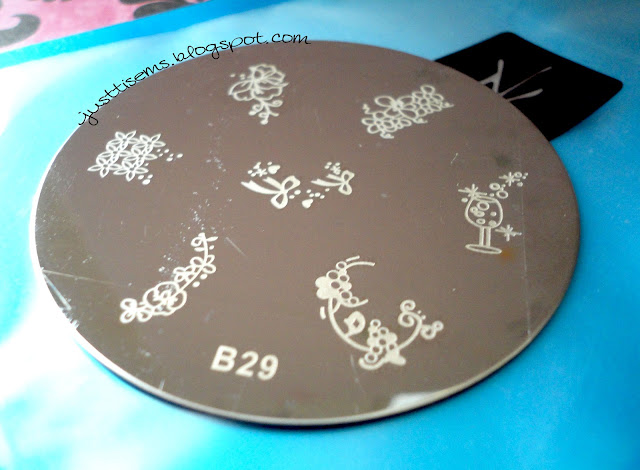
Review: Stamp Plate [SPPMB29] from KKCenterHk - N.Nail

Today I am introducing to you a stamp plate that I got from KKCenterHk: Stamping Image Stamp Template SPPMB29.
It has a wonderful design of flowers on it, but also a pair of bows and a sparkling glass of wine. As soon as I saw the image I knew I wanted it cause I always get pulled into a nice look floral design.  In order to use this, you must have a stamper and a scraper.  It doesn't necessarily have to be from the same brand in order to use the plate, but you must have those items in order to use any stamp plate for that matter.

9.17.2012

Review: KKCenterHk Microbeads Decorations Nails Art [N.NAIL-DRN382]

Hey beautiful!  *says in my best Joey way* How you doin?  Today I am bringing you another item I have received from KKCenterHk which is their microbeads decorations.  I went for their green grass microbeads [DRN382], since if you know me mint shades are honestly one of my favorites.  This was going to be my first time using microbeads.  I always wanted to try out caviar...fish eggs...microbeaded nails, but I never got the chance to until now.  So thanks to them I was able to experience something different and out of my comfort zone.
How gorgeous is that color of microbeads?  It was fun none the least having them on, but I eventually had to take it off due to the fact I couldn't resist haha.  Though I will be doing occasional accent nails of it time to time.
Microbeads Decorations Grass Green DRN382
The bottle size is 5cm x 1cm, and you could do about two looks with it.  What I mean by two looks is basically four hands all nails done by it.  Hope that makes it more clear.  It honestly depends though how you spruce it up.  If it is an occasional accent nail then it will last much longer.