Showing posts with label nail art. Show all posts

5.01.2013

Seven Deadly Sins Challenge: Gluttony

For this week's Seven Deadly Sins Challenge the theme is Gluttony.  We had a choice between doing spun sugar nails, what makes our stomach growl, or do both of them.  Like I told you in my previous challenge, I will only be doing one.   I went with spun sugar nails and decided to do my typical way of doing them.

At first I wanted to do pastels since well it is spring, but I wasn't really feeling it as much.

The nail polishes I used are:

  • China Glaze Lemon Fizz
  • Sally Hansen Xtreme Wear Lacey Lilac
  • China Glaze Refresh-mint
  • Zoya Kristen
  • Milani Nail Lacquer U Pinky Swear
So like I said I just wasn't feeling pastels at that time.  I ended up removing it the next day and decided I would use the nail polishes from the Duri Cosmetic's Spring Collection to do a spun sugar look.  You could see my review and more details about it HERE.


Nail Polishes used:

  • Satin Treat
  • Afterhours
  • Call Me Maybe
  • Dream Catcher
  • Showstopper 
  • One Night Only
Which one do you prefer?  Have you done spun sugar nails yet?

Thank you for stopping by my blog and I hope you have a wonderful day!

Review: Duri Cosmetics Spring 2013 Collection - The Showstopper


**These nail polishes were received for review purposes from the company C.I. Visions (Thank you Angie).  


Today I get to show you this wonderful spring collection from Duri Cosmetics that features six nail polish shades:  Satin Treat, Afterhours, Call Me Maybe, Dream Catcher, Showstopper, and One Night Only.  As shown about from left to right.  How pretty do those shades look?

The Showstopper Collection features bright, bold hues in shades of pink that pop, muted fluorescents, lush floral tones, vibrant reds and sophisticated neutrals to highlight the cheerful optimism and playfulness of the season.  Each color brings a new fresh take on classic shades of red, pink, lavender and nude.  - Duri Cosmetics

4.23.2013

Seven Deadly Sins Week 1: Lust

Recently my friend Alice from One Nail to Rule Them All, invited me to join the Seven Deadly Sins Challenge with several other nail gals.  This challenge had a choice of doing it daily, two a week, or once a week.  I decided to do once a week.  For this week the sin was lust, where we had to pick something that we always have wanted to do.

I don't think it was something I have always wanted to do but it was something I have been wanting to do for a while.  It was water spotted nails with turquoise stone nails.  I have wanted to do them ever since I saw Lex from Attacked Astoria Nails do them.  


Ugh let me tell you, I would rather do a water marble nail look than water spotted nail.  It has been just crazy how much polish I wasted trying to get it right.  Oh but it won't stop me from trying it again.  Like they say "Practice makes perfect."   The ring finger color blocking look was inspired by my friend Sarah from Chalkboard Nails.  

3.20.2013

Review: BornPrettyStore Heart Square Round Star Stud Rhinestone


In today's review is a very budget worthy item for nail art decoration!  It is a heart, square, round, star, triangle, rectangle, diamond assortment stud rhinestone that comes with a container that you could find at one of my favorite places to grab nail art BornPrettyStore.

3.09.2013

Back to the Basics

Lately things have been a bit hectic for me.  Mostly just been seriously busy, and the up and downs of drama.  Who wants that right?!  Well I barely have time to do any nail art or it has been no motivation.  Awhile ago I was able to actually sit down and relax around my nail polish.  I went back to the basics and did a simple leopard print.  
  • ORLY Bonder for base coat
  • Seche Vite Fast Dry Top Coat
  • Illamasqua Nomad
  • Illamasqua Prosperity
  • Wet n Wild Megalast Nail Color Disturbia
  • Black Acrylic Paint
The gold flakes on my ring finger are from BornPrettyStore, and I honestly love these things!  One of my best friend Emily, sent me a few a while back and I ended up buying more sheets!  They are just so simple to use!  You get twelve containers that are filled with gold orange green sort of foil sheets.  They cost only $6.28!  Don't forget you could use my code "LARJ61" to get a 10% off your purchase!

So there you have it that's what is on my nails at the moment.  What do you have on your nails?  What have you been up to?  

Thank you for stopping by my blog and I hope you have a wonderful day!


12.10.2012

Splatter LOVEEE!

I will always love splatter nails.  They are seriously my go to nail look when I have no idea what I want to do on my nails.  I ended up sponging some neon polishes on my nails and manipulated it about with a clear polish allowed it to dry before doing a straw splatter over it.  For my accent nail it was just a simple sponge gradient with acrylic paint, and I placed a square stud that I received from BornPrettyStore.  You could see my review for that product: here.

11.20.2012

Review: BornPrettyStore 12 Colors 3D Steel Ball Caviar Manicure Glitter Nail Art Decoration

Today I have a review to share with you, a product from BornPrettyStore, a 12 Colors 3D Steel Ball Caviar Manicure Glitter Nail Art Decoration.  If you have not heard of BPS yet, you are really missing out.  They offer items from nail art to make-up to even items for your bicycle.  Did I mention it's all free shipping worldwide?  Their prices are cheap even!  So make sure to check them out, if you have not done so already.


How colorful does that look all sitting there together?  You get twelve different colors that are inside these little jars for just $5.41!  Such a great deal really instead of buying one huge jar at a craft store of just one color.  


The colors you get are random though.  So don't expect to get the same exact colors as I did or that they have pictured on their sites.  I really didn't mind that issue at all since they're all still very colorful and easy to use.

10.25.2012

Review: KKCenterHk N.Nail Water Decal French Tip Nail Art

Today I have a pretty French floral tip water decal [WDB062] to show you.
I received these from KKCenterHk and they only cost $2.82 a sheet.  They carry several other French tip water decal designs as well (prices may vary).   They come with 14 images instead of 20, but at the price I still find it cheap.

10.03.2012

Tutorial: Gradient Spun Sugar Nails


Several people have asked me how I did my gradient spun sugar nails, so I decided to write a tutorial about it.  I do not take credit for the spun sugar technique.  This is just my version of it.  You do not need to do a gradient if you do not want to.  You may skip to the spun sugar part of this tutorial.

9.25.2012

Nails: Take a trip with me to outer-space!

Come with me and travel outer-space as I take you on a journey of my galaxy nails!

Today's nails were inspired by my lovely friends : Emily and Christina.  I am so glad I met these two really.  They inspire me in so many ways be it nails makeup or just grabbing a bite to eat.  I could always count on them for a laugh.  So make sure to check out their blogs:


They recently both did a galaxy drip, that as soon as I saw them I loved it!  I knew I had to do a galaxy mani since I haven't done for awhile, and not to mention they are always a blast to make. 


9.19.2012

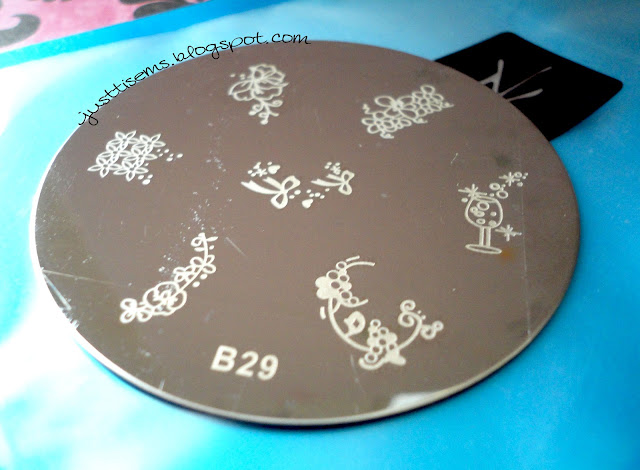
Review: Stamp Plate [SPPMB29] from KKCenterHk - N.Nail

Today I am introducing to you a stamp plate that I got from KKCenterHk: Stamping Image Stamp Template SPPMB29.
It has a wonderful design of flowers on it, but also a pair of bows and a sparkling glass of wine. As soon as I saw the image I knew I wanted it cause I always get pulled into a nice look floral design.  In order to use this, you must have a stamper and a scraper.  It doesn't necessarily have to be from the same brand in order to use the plate, but you must have those items in order to use any stamp plate for that matter.

9.17.2012

Review: KKCenterHk Microbeads Decorations Nails Art [N.NAIL-DRN382]

Hey beautiful!  *says in my best Joey way* How you doin?  Today I am bringing you another item I have received from KKCenterHk which is their microbeads decorations.  I went for their green grass microbeads [DRN382], since if you know me mint shades are honestly one of my favorites.  This was going to be my first time using microbeads.  I always wanted to try out caviar...fish eggs...microbeaded nails, but I never got the chance to until now.  So thanks to them I was able to experience something different and out of my comfort zone.
How gorgeous is that color of microbeads?  It was fun none the least having them on, but I eventually had to take it off due to the fact I couldn't resist haha.  Though I will be doing occasional accent nails of it time to time.
Microbeads Decorations Grass Green DRN382
The bottle size is 5cm x 1cm, and you could do about two looks with it.  What I mean by two looks is basically four hands all nails done by it.  Hope that makes it more clear.  It honestly depends though how you spruce it up.  If it is an occasional accent nail then it will last much longer.

9.14.2012

Review: KKCenterHk - N.NAIL 5 Pieces Resin Brown Ice Lollies Nail Art Decorations [N.NAIL-DRN181]

Hello lovelies, and how are you all doing?  Today I am here to share with you an item I had received from KKCenterHk.
N.Nail 5 Pieces Resin Brown Ice Lollies Nail Art Decorations [DRN181]
These are resin brown ice lollies [DRN181], which comes in a set of five.  How cute are these?  As soon as I saw these I knew already what I wanted to do, which was an ice cream candy sort of theme. 

9.07.2012

Nails done: Lei you down!

So this week I bring to you another Hawaiian based theme.  My focus was the lovely hibiscus and plumeria found around that beautiful tropical island.  It helped give me the time to practice up on my floral more.  I still have a hard time doing them but I would like to believe that I am getting better at it.  I never really liked doing flowers for some reason.  I think it has to do with my non-girly side really.

7.16.2012

Oh nails, Y U SO SHORT?!

So last week I mentioned in my post I mentioned that I had to cut down my nails.  A few have seen these already on my quick shot upon Instagram.  I decided to make an actual post of it. 
It'll take some time to get use to short nails again, but hopefully they speed up in growth like they normally do. 

7.11.2012

Double slap those nails! But they're done!

First off I would like to say thank you to all of those who follow or check out my blog.  Greatly appreciate it.  Second off, if you do my tutorials, or I give you inspiration please note it.  So I could check it out.  Lately I found two people who actually took my tutorials changed some words in it, but still copied exactly what I did.  :( That sort of ticked me off.  So like I say "Give credit when due!  If someone inspired you to do something, let it be known!"  Though there are times when great minds think alike, which in case high five to you!  But when it's to a T, yeah...that gets my engines going a bit... 

So sorry about that I had to get it off my chest!

Well I have been doing my nails on and off.  Just haven't really been taking pictures of it.  But they have been done!  I'll post two pictures of what I have done lately.

5.31.2012

Nails done? Mhmm! Finally!


So I finally had time to do some actual nail work on my nails, other than my typical nail gradient splatters (which I still freakin' love).
I kept it simple and just used four colors.

5.22.2012

Nails done? OH YEAH! Check!

So here is a shot of my current nails, my typical gradient and splatter look.  If you would like to know how I did it, you could spot it on my tutorial page.

5.17.2012

Nails done? OH YEAH! Check!

First off I would like to state, if you don't like the shape of my nail, you don't have to make a comment about it.  It is my nails, not yours.  You're entitled to your own opinion, and I am entitled to ignoring rude comments.  Sorry it had to be stated.
So my current nails are my typical splatter gradient type.  No matter what, I love doing them.  They are so fun and easy to do.  For a tutorial on them: Here.

5.08.2012

Tutorial: Nail Art - Sponge Gradient meets Splatter

Remember this nail look I did?  If you don't you can spot it here.
Well I was asked to make a tutorial on this, and I know it is long over due!  So sorry for that, but here it is and I hope you enjoy it!